Hi tecsploiters!
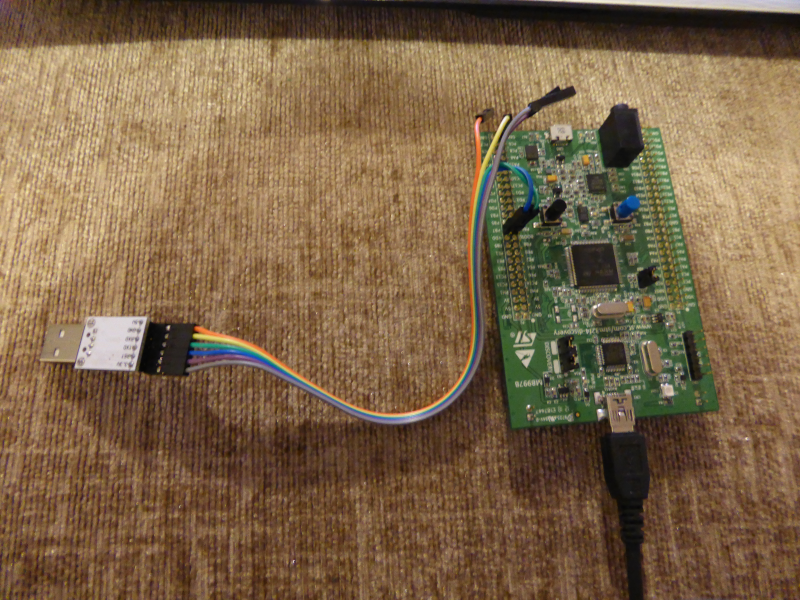
I’ve just got my hands on a usb 2 to UART serial converter cable and thought I’d do a post on how to transmit and receive data between your PC and the STM32F4 Discovery board. I’m also considering using this little cable to write a C#.net lib that can be used to configure the STM32F4 Discovery from .net without writing any c at all – but that’s for another post! this post will show you how to use a program called putty to connect to the STM32F4 Discovery board and then type commands to control the on board LEDs – for now it simply allows you to switch each LED on or off.
 UART Connector |
 UART Pins |
What you’l need
As well as the serial cable you’ll also need to download a program called Putty, this program lets you easily setup a serial connection to the STM32F4 Discovery board and then send and receive text based commands. (You can use other programs such as hyper terminal but i find putty to be the easiest to use)
Before you wire up the connector you should first plug it into your USB port and make sure that windows properly detects the connector. My PC couldn’t find the drivers so I had to install them manually, you can find the drivers I used here (for windows 7) – note that I un-plugged the connector before installing the drivers.
Once you’ve got the drivers installed the next task is to find out what COM port your connector is using, this tends to vary system to system you can find this out by opening up device manager and browsing to ‘Ports (COM & LPT)’ you should see your device listed and the COM port is in the name, in this case ‘COM4’. If you select properties you can also view the settings for the port and adjust the baud rate, in this case you want it set to 9600.
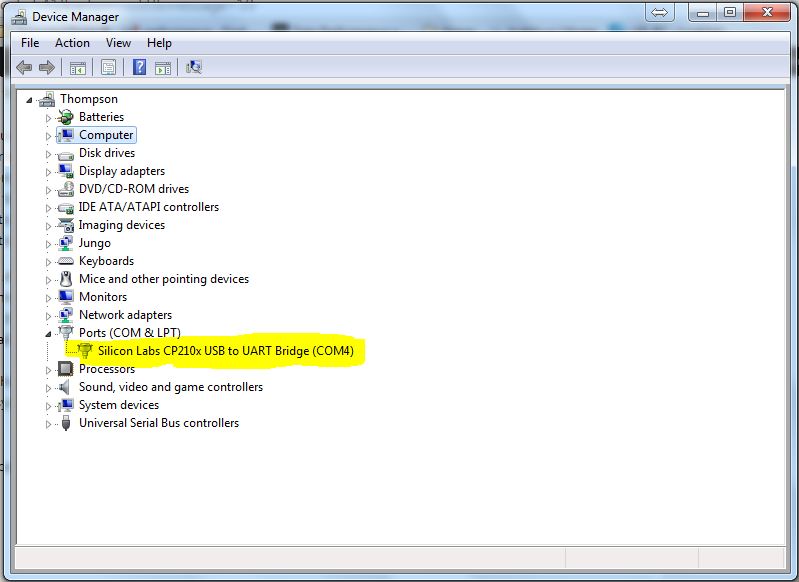 Find COM port |
|
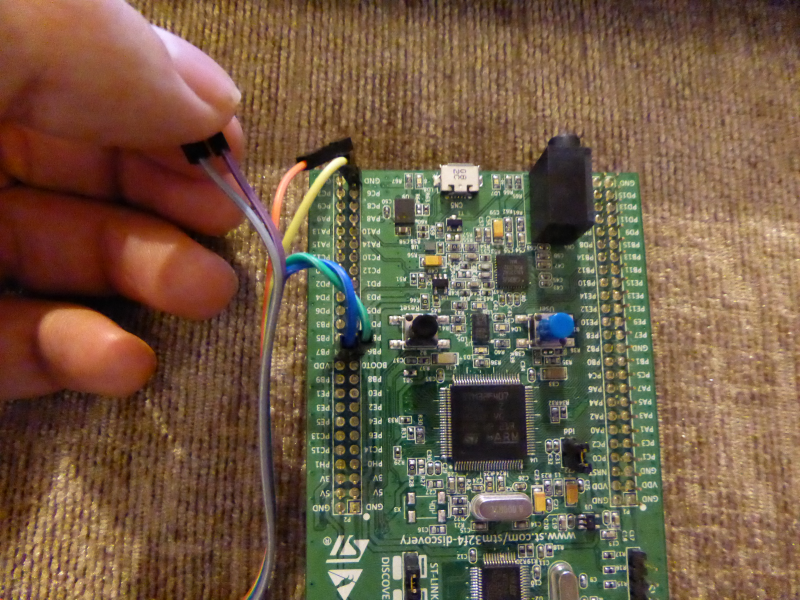
There are many versions of this little module available, the version i’m using has 6 pins, we only use 3 of them for this project (as the STM32F4 Discovery is being powered by the main USB port) They should be wired up as follows:
- 3.3v – can be used as a power source, not used in this project
- 5v – can be used as a power source, not used in this project
- RST – reset pin not used in this project
- TXD – transmit cable, connected to the receive pin B7
- RXD – received cable connected to the transmit pin B6
- GND – ground cable, connected to the GND pin
Once wired up download the source code project (you will need to register your email first) and deploy the binary to the STM32F4 Discovery using the ST-Link utility. The code is commented and and takes you through the steps to configure the USART using pins B6 and B7 on the STM32F4 Discovery board.
The last step is to connect to the board from your PC using putty, start by running the Putty executable (you should get a screen like the one below) change the connection type to serial and then key in the serial line the COM address you found previously (in my case COM4). Make sure the baud rate is 9600.
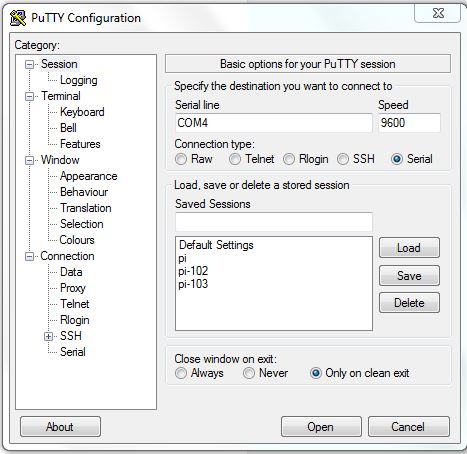 Putty Connection |
|
Once configured click open and you should be presented with a black MS-Dos like screen. Click the reset button on the STM32F4 Discovery board (the black push button) and you should see a nice tecsploit welcome message
 Putty Welcome |
|
If you get this far then you are ready to start sending commands to the STM32F4 Discovery board, click anywhere in the Putty console and type “L3ON” then press enter, you will see LED 3 on the STM32F4 Discovery board turn on! Type “L3OFF” and hit enter – and it will turn off again.
The following commands have been implemented in this sample – you can guess what they do! 😉
- L3ON
- L3OFF
- L4ON
- L4OFF
- L5ON
- L5OFF
- L6ON
- L6OFF
Note that you must use upper case letters, and that you wont see any characters appear as you type. Once you hit enter you will see what you have typed echoed back to you from the STM32F4 Discovery
Trouble Shooting
if you have any problems you may want to check the following:
- Make sure the RX pin of the STM32F4 Discovery is connected to the TX pin of the connector, and the TX pin of the STM32F4 Discovery is connected to the RX pin of the connector.
- Make sure you have connected the ground port of the connector to the ground of the STM32F4 Discovery
- Make sure the baud rate is set to 9600
- Make sure your using the correct COM port.
Thank you. The example is easy enough to follow. Now i need to connect this COM port to VB6